Sponsored
- Unlock Seamless API Testing with Postman! Ensure your APIs are reliable and performant with Postman's comprehensive testing platform. Automate your tests, monitor results, and catch issues early to deliver a flawless digital experience. Get started now!
Many thanks to the sponsors who make it possible for this newsletter to be free for readers.
Want to reach thousands of .NET developers? Sponsor TheCodeMan →
Background
So, what is Api Key Authentication in ASP.NET Core? Let's consider a real-world example. Imagine you've developed a weather dashboard that fetches data from your own weather API. This dashboard displays real-time weather data, forecasts, and other information. However, you want to:
- Limit Access: You don't want just anyone to be able to access your API and start pulling data from it.
- Track Usage: You want to know which clients are using your API, how often, and for what purposes.Implement
- Prevent Abuse: Without some sort of authentication, someone could spam your API with requests, consuming resources and potentially costing you money.
Commercialization: If your API provides valuable data, you may want to monetize it. Having an API key for each client allows you to implement different pricing tiers easily. This way, you can ensure that only authorized clients are accessing your data, track who is accessing it, and potentially even how much they are accessing. So, by implementing API key authentication like in the example, you can secure your API to ensure that it is used only in ways that you have explicitly allowed. Really nice, right? Let's see how to implement Api Key Authentication in ASP.NET Core using C#.
Step #1: Create Api Key Attribute
Why you need this? The ApiKeyAttribute class derives from ServiceFilterAttribute and is used to decorate the controllers or actions where you want this specific authorization to take place. For example, you want to decorate this endpoint:
[ApiKey][HttpGet(Name = "GetAllUsers")]public List<string> GetAll(){ return new List<string> { "Stefan" };}In order to achieve this, you need to do following:
public class ApiKeyAttribute : ServiceFilterAttribute{ public ApiKeyAttribute() : base(typeof(ApiKeyAuthorizationFilter))}The constructor calls the base constructor with typeof( ApiKeyAuthorizationFilter ), which means that it attaches the ApiKeyAuthorizationFilter to the actions decorated with this attribute. In the ApiKeyAttribute class, the line : base(typeof(ApiKeyAuthorizationFilter)) signifies that this attribute is essentially a wrapper around the ApiKeyAuthorizationFilter. When you decorate a controller or action method with [ApiKey] , it will trigger the ApiKeyAuthorizationFilter's OnAuthorization method for that specific controller or action. So, we need ApiKeyAuthorizationFilter with OnAuthorization method - let's create that in the next step.
Step #2: Implement ApiKey Authorization Filter
The ApiKeyAuthorizationFilter class implements IAuthorizationFilter , which means it contains logic to execute when a request requires authorization. This filter checks if an API key is present and if it's valid.
public class ApiKeyAuthorizationFilter : IAuthorizationFilter{ private const string ApiKeyHeaderName = "x-api-key"; private readonly IApiKeyValidator _apiKeyValidator; public ApiKeyAuthorizationFilter(IApiKeyValidatior apiKeyValidator) { _apiKeyValidator = apiKeyValidator; } public void OnAuthorization(AuthorizationFilterContext context) { string apiKey = context.HttpContext.Request.Headers[ApiKeyHeaderName]; if(!_apiKeyValidator.IsValid(apiKey)) { context.Result = new UnauthorizedResult(); } }}OnAuthorization Method:
This method is called when the request is being authorized. It extracts the API key from the request header:
var apiKey = context.HttpContext.Request.Headers[ApiKeyHeaderName];Then it uses the apiKeyValidator.IsValid(apiKey) method to check if the API key is valid. If the API key is not valid, context.Result = new UnauthorizedResult(); sets the response to unauthorized, effectively rejecting the request. Great. But you don't have apiKeyValidator right? No problem. Let's implement it.
Step #3: Implement ApiKeyValidator
Your ApiKeyAuthorizationFilter class relies on an instance of a class that implements IApiKeyValidator to validate API keys. The IsValid method of this instance will be called to check if an API key is valid or not. Currently, since IsValid returns false, all requests would be considered unauthorized.
public class ApiKeyValidator : IApiKeyValidator{ public bool IsValid(string apiKey) { //Change logic for validation api key return false; }}
public interface IApiKeyValidator {
bool IsValid(string apiKey);
}
Of course, none of this would work without Dependency Injection, so let's register the necessary services.
csharp
builder.Services.AddSingleton
## Api Endpoint TestingSince I hardcoded that the validation always returns false for the validity of the Api Key, every request will be rejected, more precisely 401 will be returned because it is not authenticated, because the ApiKeyHeader is not present in the Request.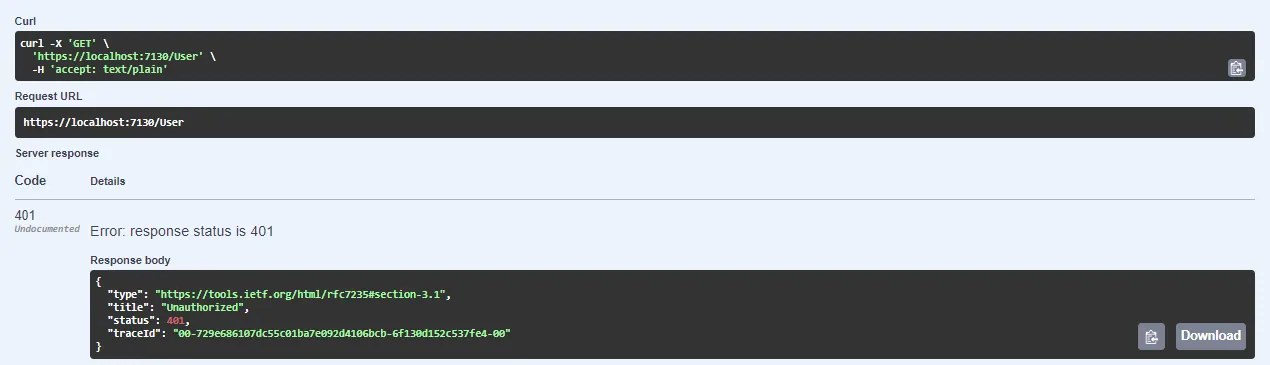And that's it. You have implemented Api Key Authentication.## Bonus: Use MiddlewareYou can achieve absolutely the same effect by using Middleware.Here's how you can do it:
csharp public class ApiKeyMiddleware {
private readonly RequestDelegate _next;private const string ApiKeyHeaderName = "x-api-key"; public ApiKeyMiddleware(RequestDelegate next){ _next = next;} public async Task InvokeAsync(HttpContext context){ if(!context.Request.Headers.TryGetValue(ApiKeyHeaderName, out var extractedApiKey)) { context.Response.StatusCode = 401; await context.Response.WriteAsync("Api Key was not provided."); return; } if(extractedApiKey != "API_KEY") { context.Response.StatusCode = 401; await context.Response.WriteAsync("Unauthorized."); return; } await _next(context);}
}
And that's it.## Wrapping upIn today's Newsletter issue, I showed you how to implement Api Key Authentication in ASP.NET Core in a small number of steps and in a short time.It is necessary to implement 3 things:**1. ApiKeyAttribute** - Allows you to decorate controllers and endpoints with [ApiKey].**2. ApiKeyAuthoizationFilter** - Executes the OnAuthorization method on every request. This is where you actually put the complete logic of your authentication.**3. ApiKeyValidator** - Only the encapsulated logic of how you will validate the api key that you receive in the request.You can go to the project's [GitHub repository](https://github.com/StefanTheCode/ApiKeyAuthenticationDemo) and get acquainted with the details.That's all from me today. <!--END-->